
Themes are one of the WordPress components that makes it one of the most powerful content management systems (CMS) out there.
The entire look and feel of your site will be based on your theme. In this post, I will show you how to install a WordPress theme.
The two types of WordPress themes
There are two types of WordPress themes made available to users. You have free themes that you can access within WordPress. Then there are premium themes made by third-party companies like us. What installation method you choose will depend on what type of theme you choose to use.
The free versions are not bad by any stretch. What they do lack are features and support. Which is a fair trade off considering they don’t cost users anything. You’d be surprised at how many themes are available there currently are in the WordPress theme repository.
Premium versions typically offer better support and have a ton of useful features. What theme to select will ultimately depend on what features you need to have. They can be quite expensive though. The average price of premium themes is around $40.
But as far as design goes, free and premium versions offer variety. Premium versions, however, offer more flexibility and customization.
How to install a WordPress theme
Let’s jump right into it, shall we? Here’s how to install a WordPress theme for your site.
Installing a free theme
Free themes can be installed from the WordPress repository. It’s really simple to do and should only take a couple of minutes from start to finish. To install a new theme, you should be logged into your account.
Step 1: Finding a theme
You should already have a theme installed by default. WordPress updates the default theme on an annual basis. Regardless what theme you have installed, you follow the same process.
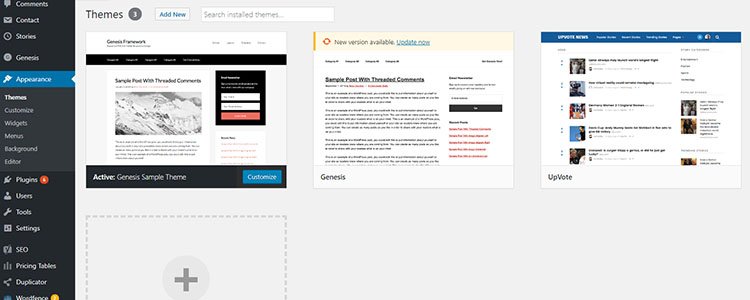
From your WordPress dashboard, go to your sidebar. Head on over to Appearance > Themes. On your main screen, you will find an Add New button. Click it.

Step 2: Installing a theme
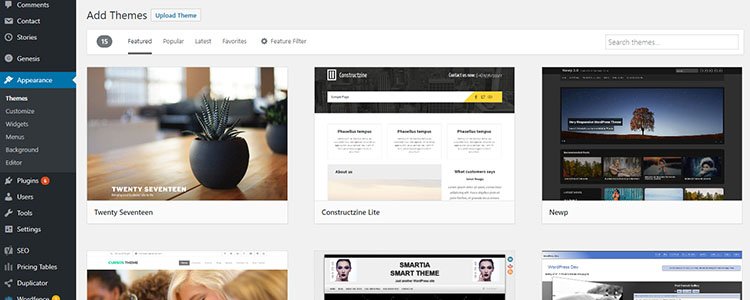
From here you will have a couple of options. You can browse themes by category (Featured, Popular, Latest, and Favorites). You can also use the search box to look for a specific theme. This is handy if you’ve done your research and already know what theme you want to install.
You can click the Preview button if you want to see what the theme would look like. Work your way through and once you’ve decided on a theme, simply click Install.
Step 3: Activating a theme
At this point, you should have the theme installed. But we’re not done yet. The theme would still not be reflected on your site. To do that, you will need to activate the theme.
Once the theme has finished downloading, the Install button would be replaced with an Activate button. Clicking Activate would replace your current theme with the one you just installed.
If you’re not ready to install just yet, you can choose to do so at a later time. After a theme is activated, you can start customizing your it to your liking.
Installing a premium theme
Installing a premium theme won’t be as easy as you would a free version. But just follow this guide on how to install a WordPress theme and you should be just fine. As before, you should be logged into your account to proceed.
Step 1: Downloading a theme
You won’t be able to download a theme from WordPress. Instead, you would have to head on over to a third-party theme developer and buy your theme from them. Right after your purchase, they should provide you a zip folder containing the theme you just bought. This is what you’ll be using to install the theme.
Step 2: Uploading the theme to WordPress
From your WordPress dashboard, head on over to your sidebar. Go to Appearance > Themes. Go ahead and click the Add New button. On the upper left-hand side of the main screen, you will find the Upload Theme button. It’s right next to the text that says Add Themes. Click it.
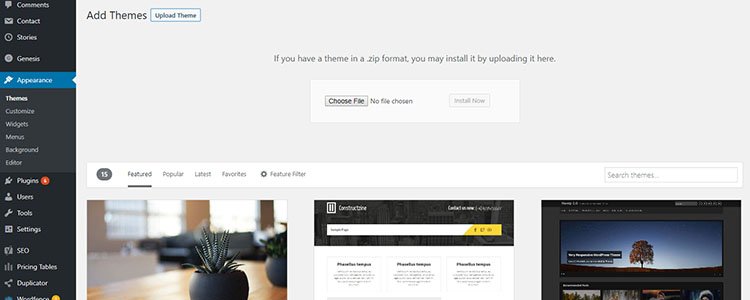
Clicking the Upload Theme button opens the uploader. Hit the Choose File button and select the theme you downloaded. Upload the zip file. Once done, hit the Install Now button.
Step 3: Activating the theme
After the upload is complete, the theme will automatically be installed. From there, it’s all a matter of activating the theme. You will be given three options on how you would like to proceed. You can do a Live Preview and see what your site would look like once the theme is activated. You’re also able to Return to the Themes Page if you’d like to continue browsing themes. Or you could go ahead and Activate the theme you purchased.
Once activated, you can customize the theme straight from WordPress.
Congratulations, you just installed your WordPress theme. Have fun with your revamped website.
Note: Some themes require certain plugins to be installed before they can be activated. If that’s the case, you’ll be prompted by a Begin Installing Plugin message. Just click on the button and install all the necessary plugins. It would proceed then proceed to activate your plugin.
# Demo content
If your theme does not look anything like the demo you saw from the developers, you need not worry. Themes are customizable and chances are, the developers tweaked their theme which made it look slightly different from the one you downloaded.
If you want your site to look exactly like the one in the preview, developers usually throw in what’s called a Demo Content. These are a series of instructions found in the theme’s documentation.
Unfortunately, each theme is different so the actions you’d have to take would vary from theme to theme. This is all optional though. If you’re happy with what you’ve got then there’s no need to go through this process.
A bit of warning though. Making changes to your theme will override all the changes you’ve made up to that point. If you’re using Demo Content, right after the plugin had been activated.
# Changing WordPress themes
The nice thing about WordPress is that you’re not limited to using one or two themes. You can change it as many times as you need. There are thousands to choose from. Some are geared more towards blogging sites, some are designed for photography, and there are themes that integrate e-commerce.
To change your WordPress theme, simply follow the same steps listed above. Here’s a guide on the best WordPress themes that you ought to consider.
# Customizing the theme
If you want to make changes to your theme, just head on over to your sidebar and go to Appearance > Customize. From there you will be able to change the site name, photos, colors, text, menus, and the widgets on your site.
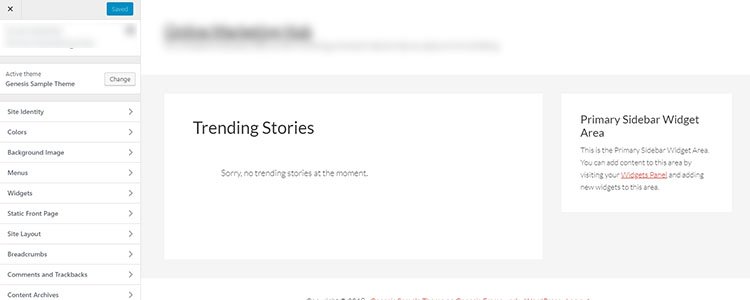
The changes you can make would depend on the theme you selected. Some themes are more powerful than others. That’s why choosing the right theme is important. However, most themes offer the same basic customization options.
The changes you make within the editor will not be reflected on your site right away. So feel free to play around with the options until you’re satisfied with your selections. Once you’re ready, hit the Save and Publish button.
Conclusion
I hope this tutorial helped you on how to install a WordPress theme. So if you have any questions or need any help, plus let us know in the comments below.