Learning how to add Google Analytics to WordPress is an invaluable part of running your own website.
What Google Analytics provides for free is a way to learn about your audience through individualized traffic stats. Knowing who your audience is and how they interact with your website is crucial for your success.
That’s why in this article, we’ll share why Google Analytics is so important and how you can install Google Analytics on your WordPress blog or website in easy to understand steps.
What is Google Analytics and Why Do You Need It?
Google Analytics is software designed to help you to make better data-driven decisions by showing you the stats that matter and taking the guesswork out of managing your site. It can give you valuable information about what is and isn’t working on your site, allowing you to make informed decisions about its future.
Google Analytics gives you the following data to evaluate:
Who Is Visiting Your Website
Google Analytics gives you demographic information about your site visitors. For instance, discover the geographical location of your audience, their ages, and gender. Plus, find out the browsers people use and other important information like screen resolution, JavaScript support, Flash support, and language.
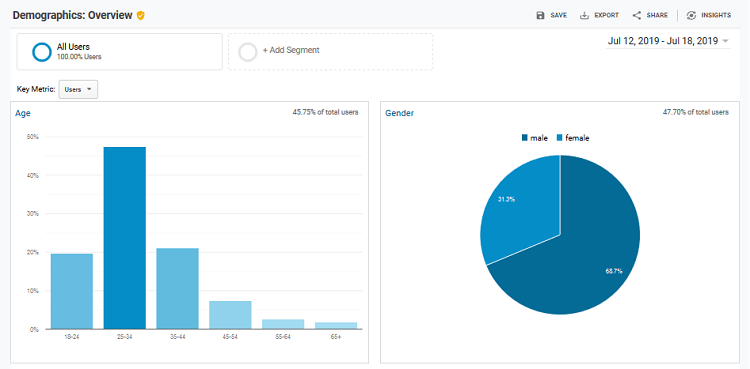
This data can help in many ways. For example, it can help you determine how to design your website to work with the browsers and screen sizes of your users. Plus, once you know where in the world the majority of users are coming from, you can use a translation plugin and translate your site’s content into their preferred language.
What People Do On Your Website
With Google Analytics, you can track what people do while visiting your website. For example, see how long they stay on your website and how many people visit each day. You can also see how many people abandon after visiting one webpage (bounce rate) and which webpages are the most popular.
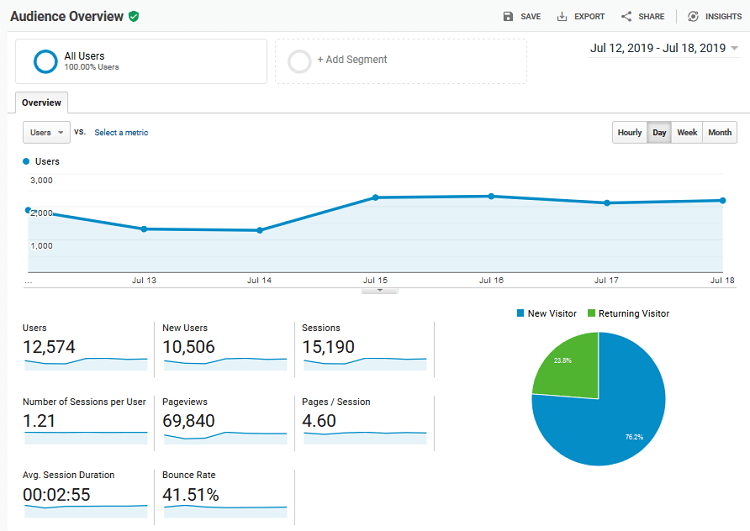
Knowing more about what people do once on your website helps you make better decisions when it comes to the type of content you publish and products you sell.
When People Visit Your Website
Your Google Analytics data can tell you when the busiest times of the day are for your website. This way, you can schedule your content to go live at those times. This will boost site engagement and interest in what you have to offer. Not to mention, it’ll help you grow your business.
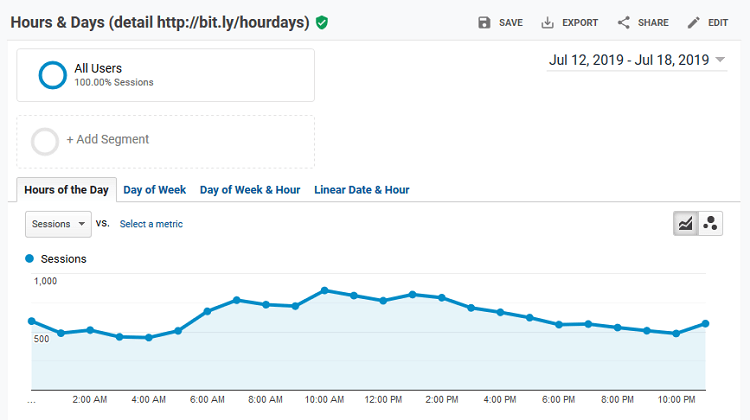
This is especially helpful for making sure the content you publish reaches those in different time zones at appropriate times.
How People Find Your Website
Finding out where your site visitors are coming from can help you fine-tune your marketing efforts. For example, people can come from search results (e.g., Google), social media, referral links, direct links, and more.
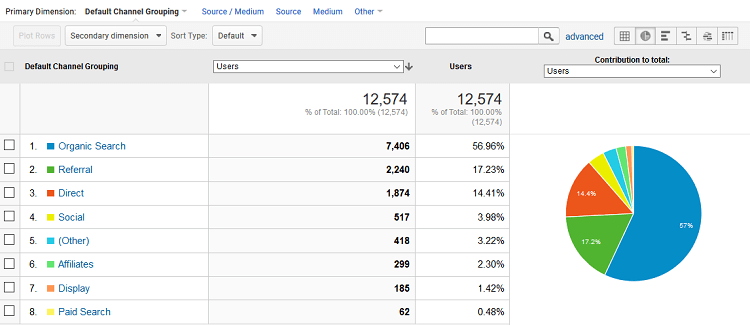
If you want, you can break down certain traffic sources further to glean even more information about site traffic. For example, if you notice the majority of people are coming from organic search results, break it down into search engines (e.g., Google, Yahoo, and Bing). The same can be done for social media networks, referral links, advertisements, and more.
How People Interact with Your Content
Beyond learning how long people stay on your website or how quickly they leave, Google Analytics will show you how people interact with your content. For example, you can define specific goals such as number of email subscriptions, purchases in your online store, or contact form signups and monitor your progress.
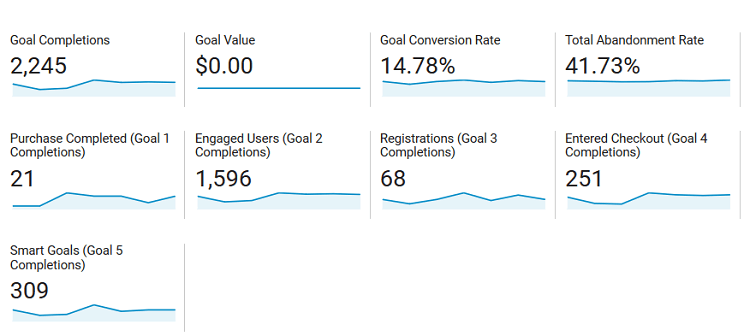
In the end, Google Analytics eliminates the guesswork and allows you to focus on the stats that matter so you can make data driven-decisions for your blog, online business, or eCommerce shop.
How to Sign up with Google Analytics
Now that you understand why Google Analytics is so important to the success of your website, it’s time to take a look at how to get started with Google Analytics so you can start tracking data on your WordPress website.
Step 1: Create a Google Analytics Account
Google Analytics is a free online tool that anyone with a Google or Gmail account can use. To get started, either create a Google Analytics account or sign in if you already have one.
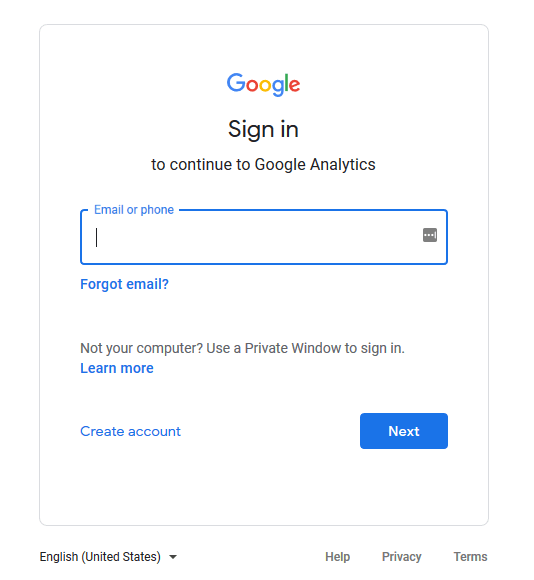
Next, sign up for Google Analytics by clicking Sign up.

On the next screen, you’ll be given the choice to track a website or mobile app. Select Website. In addition, enter an account name, website name, website URL, country, and time zone.
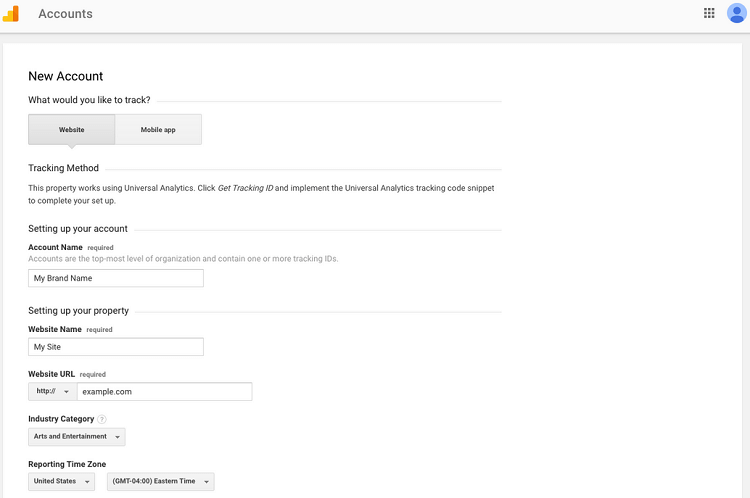
Once you’ve set up your account, click Get Tracking ID, read to the Google Analytics terms and service, and click ‘I Agree.”
Step 2: Copy the Google Analytics Tracking Code
Now you’ll see your Google Analytics tracking code. You’ll need this code later depending on the method you choose in the upcoming steps. Because of this, we suggest keeping this tab open.
![]()
How to Add Google Analytics to WordPress
There are a few different ways to add Google Analytics to WordPress. We’re going to share with you three different ways. This way, you can choose the method that’s best for you.
1. Install Google Analytics in Your WordPress Theme
This is an advanced method and should only be used by those familiar with code. In addition, it’s good to know that if you use this method, and decide to update or change your WordPress theme, you’ll lose this work and need to do it again to ensure Google Analytics continues tracking your site’s data.
That said, here are the two places in your WordPress theme you can add your Google Analytics tracking code.
To add your tracking code to your theme’s header.php file, go to Appearance > Editor and click the header.php file under the Templates section.
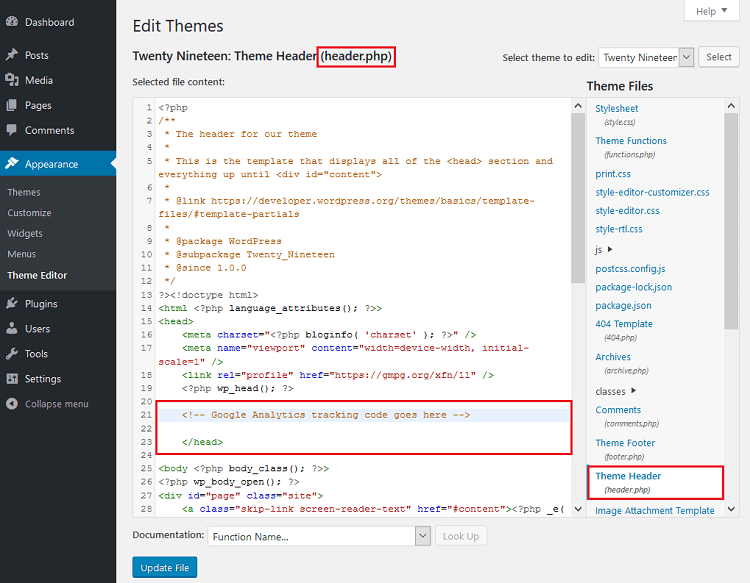
Then, add your Google Analytics tracking code before the close of the </head> tag. Save your changes by clicking Update File.
If you want the tracking code to be added to every page on your WordPress site, you can also edit your theme’s function.php file and add your tracking code there.
2. Insert Headers and Footers Plugin
Rather than edit your theme’s file directly and mess with code, you can use a WordPress plugin like Embed code instead.
To do this, install the Embed code plugin on your website like you would any other WordPress plugin.
Then, go to Settings > Embed Code and paste your Google Analytics tracking code in the headers section.
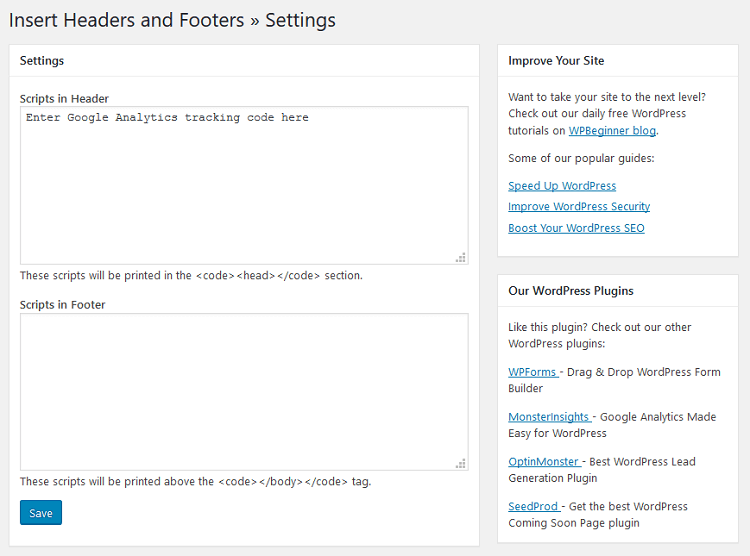
Click Save to store your changes and let Google Analytics start tracking your site’s data.
3. Google Analytics for WordPress by MonsterInsights
The last method we are going to share with you involves using the MonsterInsights WordPress plugin. It’s a popular Google Analytics plugin that makes tracking your site data easy. Plus, you can view some of the most popular stats right in your WordPress dashboard.
There is a free and premium version of MonsterInsights. If you need more advanced features like ads, author, and eCommerce tracking, we say go for the premium version. If not, the free version works just fine.
Step 1: Install and Activate MonsterInsights
The first thing you’ll need to do is install and activate MonsterInsights on your website just like you would any other WordPress plugin. For this tutorial, we’ll use the free version. That means installing it can be done by going to Plugins > Add New in your WordPress dashboard and searching for MonsterInsights.
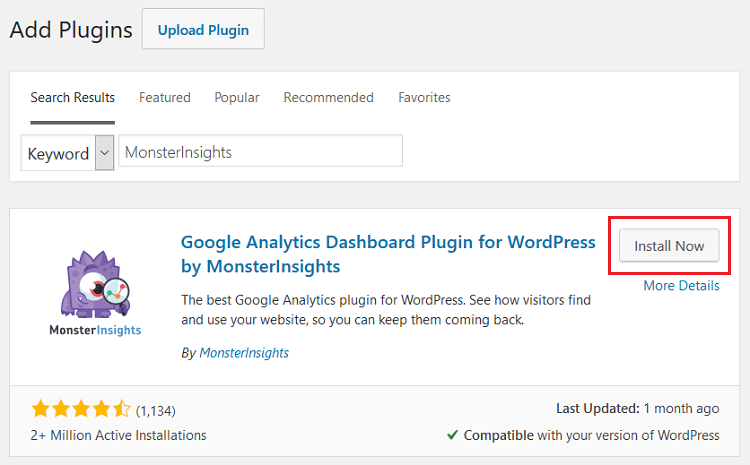
Click Install Now and then Activate.
Step 2: Connect MonsterInsights to Google Analytics
Once MonsterInsights is installed and activated on your site, you’ll be prompted with a setup wizard to guide you through the process of installing Google Analytics.

Start by choosing a website category: Business Website, Publisher (Blog), or eCommerce.
On the next screen, click Connect MonsterInsights.

When you do, you’ll be asked to sign in to your Google account. You’ll then be asked to give MonsterInsights access to your Google Analytics account. Click Allow.
The last step asks you to pick the website you’d like to track. Select your website from the dropdown and click Complete Connection.
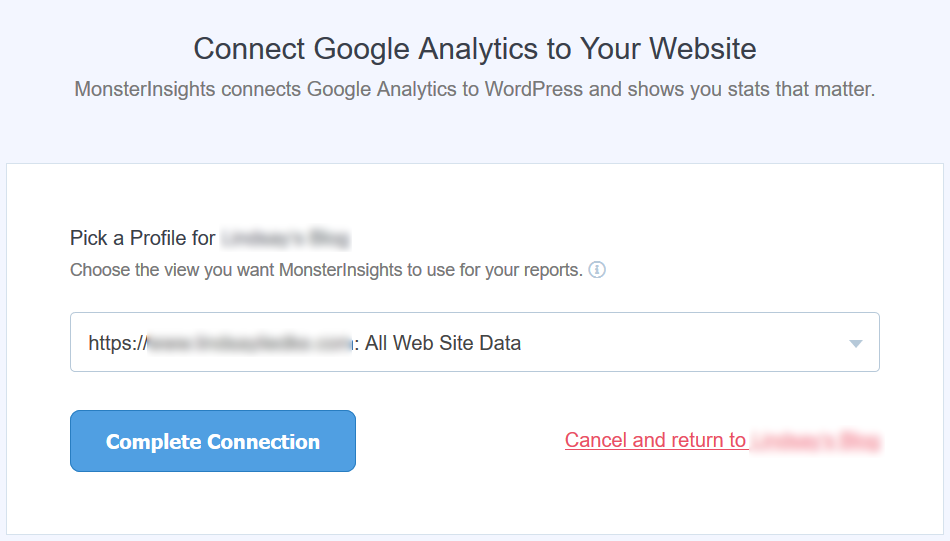
Step 3: Configure Settings
MonsterInsights will now add Google Analytics to WordPress. Next, you’ll need to configure the settings.
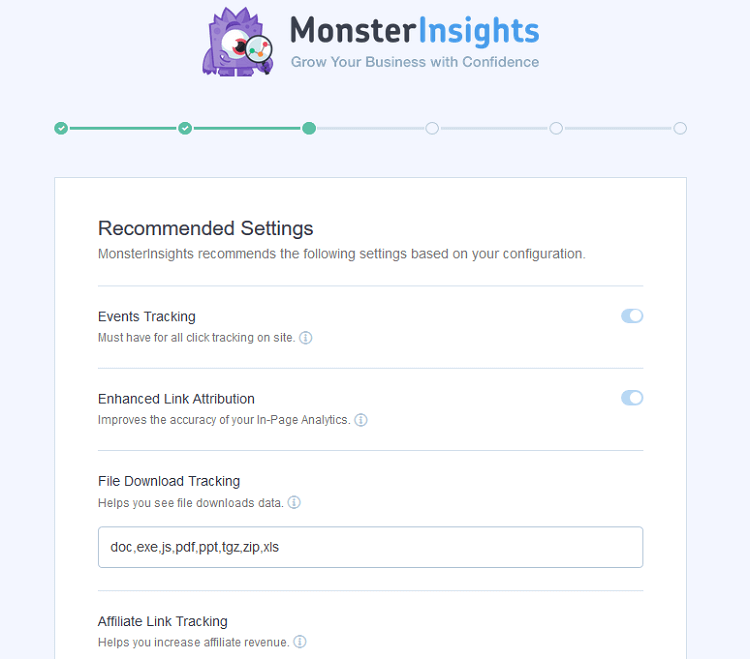
Here you’ll configure things like:
- Events tracking
- Enhanced link attribution
- File download tracking
- Affiliate tracking
- User roles
- Automatic updates
When you’re done, click Save and continue.
The next screen gives you a preview of the types of add-ons you’ll have access to if you upgrade to the premium version of MonsterInsights. To skip this step just click Save and continue.
The last screen will give you a chance to install WPForms, which is a contact form plugin. You can skip this step if you already have a contact form solution on your site.
And there you have it! Google Analytics is now added to your WordPress site.
View Google Analytics Reports with MonsterInsights
The nice thing about using MonsterInsights is that you can view real-time reports on your WordPress dashboard so you don’t always have to log into your Google Analytics account to see your site’s data.
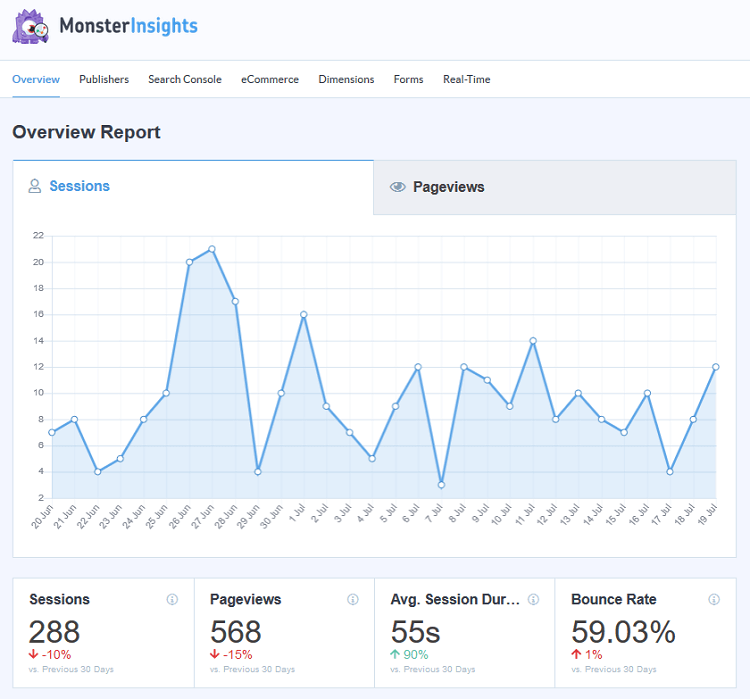
All you have to do is go to Insights > Reports and you can data like number of pageviews, sessions, and bounce rate.
If you don’t use MonsterInsights to add Google Analytics to your site, you can always access your data in your Google Analytics account.
And there you have it! You now know how to add Google Analytics to WordPress using three different methods.
Knowing who your target audience is, how they get to your site, and what they do once they arrive is crucial if you want to make improvements and grow your blog, online business, or eCommerce shop. It will also give you the tools needed to create a better user experience for those that come to your site looking for what you have to offer.
Which method did you use to add Google Analytics to your WordPress website? We would love to hear all about it in the comments below!

