Installation
In this first section of the documentation we'll be going over installing the theme on WordPress, installing required and recommended plugins and importing the demo content ( which is optional ).
Theme
At meridianthemes.net/dashboard you can download the theme files, you will see the ZIP file called meridian-recipes, that is the file you install the theme with.
- Log in to your WordPress Admin Panel
- Go to Appearance → Themes
- Click Add New ( you'll see it at the top, on the right side of the page title )
- Click Upload Theme
- Click Choose file (or "Browse", depending on your browser) and choose the meridian-recipes.zip
- Click Install Now
- After WordPress finishes installing click Activate
Plugins
After you active the theme you will be prompted to install some required and recommended plugins the theme uses, as seen in the screenshot below.

Meridian Recipes Features - Registers the custom post types ( recipes ) and taxonomies ( recipe categories ) used by the theme. It is required for the theme to function.
Meridian Styler - Adds a panel in the front end which you can use to change styling ( colors, spacings, typography... ) on pretty much any element. It is not required for the theme to function, use it only if you are going to make styling changes. More info later in the documentation.
Meridian Popups - Adds popups functionality. It is not required for the theme to function, use it only if you want the popups functionality. More info later in the documentation.
Meridian Promo Bars - Adds promo bars functionality. It is not required for the theme to function, use it only if you want the promo bar functionality. More info later in the documentation.
Optin Forms - Easily add newsletter subscribe forms from various sources like AWeber, iContact, MailChimp, GetResponse, MadMimi, Interspire Email Marketer and ConvertKit. More info at plugin page on WordPress. Note: Select design number 6 when creating the form.
Contact Form 7 - Used for a contact page. It's the most popular WordPress plugin for contact forms. Contact Form 7 can manage multiple contact forms, plus you can customize the form and the mail contents flexibly with simple markup. The form supports Ajax-powered submitting, CAPTCHA, Akismet spam filtering and so on. More info at the plugin page on WordPress
Demo Content ( one click importer )
Once you activate the plugins the one click importer will show up at the top, like in the screenshot below.
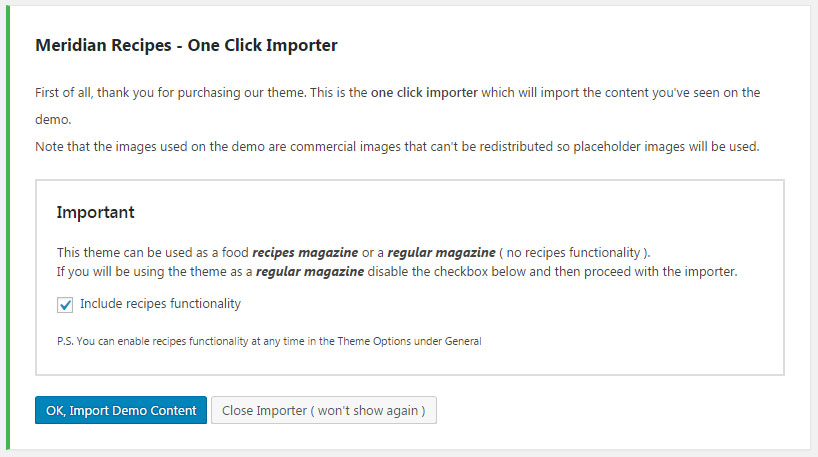
The theme can be used as a recipes magazine or a regular magazine. If you will be using it as a regular magazine simply disable the "Include Recipes Functionality" option before proceeding with the importer.
Click the OK, Import Demo Content button and it will start. Once done it will look like this:
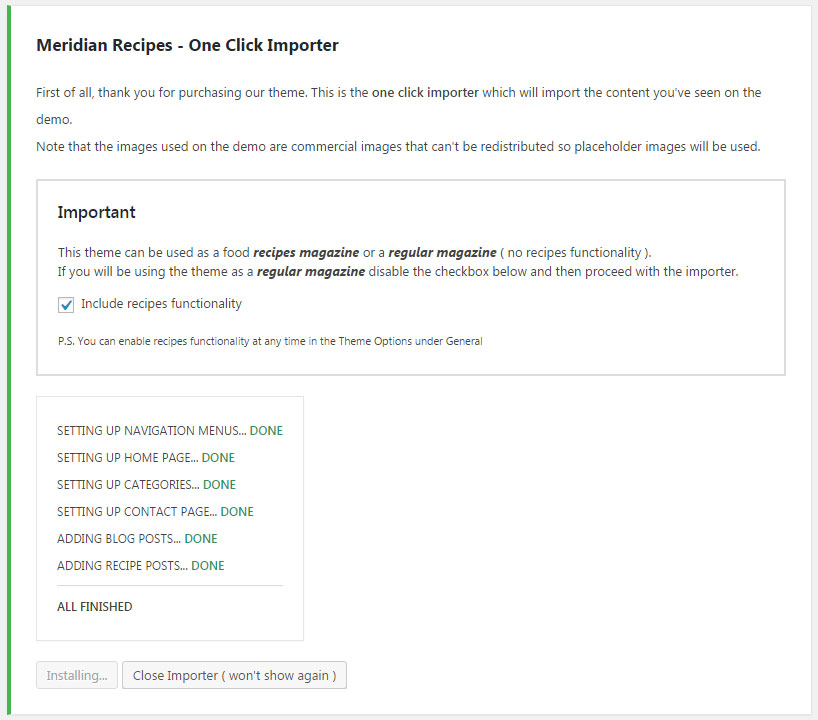
Press the Close Importer button to hide the importer and that's it.
General
In this section of the documentation we'll be covering the general features of the theme. Those are features like navigation menu locations, sidebar locations, custom widgets and theme options.
Navigation Menus
There are 3 navigation menu locations in the theme, the first one is Primary and is located just below the logo, the second one is Footer and is located at the bottom of the footer, the third one is Side Panel and is located in the side panel on the left.
Creating menus and applying them to the locations is standard WordPress usage and if you've used WordPress before you won't run into any issues. But if you're not quite familiar with WordPress and how navigation menus work, here are some resources to help you out:
- Official WordPress guide on navigation menus [ text ]
- Youtube video on how to use the navigation menus feature [ video ]
- How to add navigation menu in WordPress ( by wpbeginner.com ) [ text + images ]
Sidebars & Widgets
There are 10 sidebar/widget locations in this theme. You can add widgets to those locations in WP admin → Appearance → Widgets. The names of the locations are pretty much self explanatory:
- Sidebar
- User Profile
- Module 4
- Module 6
- Module 8
- Module 11
- Module 12
- Footer Column 1
- Footer Column 2
- Footer Column 3
Like with the navigation menus, adding widgets to sidebars is also general WordPress usage, and if you've used WordPress before you won't have any troubles here. But in case you haven't used it before, here's some resources to help out:
- Official WordPress guide on sidebars and widgets [ text ]
- How to add and use widgets in WordPress ( by wpbeginner.com ) [ text + images ]
- Youtube video on how to add widgets [ video ]
The theme comes with several widgets custom made for the theme. You can recognize them by their names, they start with MeridianThemes. Below you can see some examples of how those widgets look like and what options do they have.
MeridianThemes - About Author


MeridianThemes - Subscribe


MeridianThemes - Social


MeridianThemes - Posts List


MeridianThemes - Search


Theme Options
The theme uses the WordPress Customizer feature for it's global/theme options. Customizer is a native WordPress feature which was added in WordPress back in 2012, so if you've ever used WordPress you won't have any problems.
Note: Only functionality related options are in the Customizer. For styling options use Meridian Styler, more on that further down the documentation.
You can access the customizer at WP Admin → Appearance → Customize. In there you will see these sections:
- General
- Social
- Header
- Footer

General
In the general section of the theme options you can set switch on/off the recipes functionality, set the logo image, both regular and for retina displays. You can also set the image that shows on the WordPress login page, to replace the default WordPress logo.

Social
In the social section of the theme options you can set the URLs to your social website profiles. They will be used for the social elements/icons in the header and in the social widget.

Header
In the header section of the theme options you can enable/disable different header elements like the search, social links and account links ( sign in, my account, sign up )

Footer
In the footer section of the theme options you can enable/disable differents footer elements and also change the copyright text.

Homepage
In this section of the documentaion we will go over how to set up a homepage, the featured section at the top and the main content sections.
General
The demo importer will import all the homepage variations and set the one like on the demo to be the default homepage. If you are going to keep that default homepage, either delete the rest or set them to draft or private.
If you prefer one of the other homepage variations to be your homepage, you can simply change it following these instructions:
- Go to WP admin → Settings → Reading
- You will see a select dropdown called Front Page where you can choose the page you want.
- Save changes and that's it
Below is a screenshot of that section and the select dropdown field.

If you are building the homepage from scratch make sure to set the Template option to Homepage.
Featured Section
The featured section is the listing of posts/recipes at the very top. To add a blog post or a recipe post to that section add the tag featured to it.

When editing/adding a page you will see the options for the featured section just below the main content editor.

There are 4 different styles you can choose from ( screenshots below ). You can also choose which post types to display ( blog, recipe or both ) and also the tag from which the posts will be shown ( defaults to featured ).
Here's how the different styles look like:


Content Sections
These sections will be displayed in the main area of the page. They are meant to be used on the homepage but you may use them on any page you like. There are over 15 different modules to choose from.

Simply click the Add Section button to add a new section, choose the Module you want to use and then set the options you like, every module comes with a number of options.
If you want to reorder sections you can simply click the move up and move down elements.
Adding screenshots of every module would make for a very very long list of images, so for examples on how all the modules look like check out the demo page with all the modules
Posts and Pages
In this section of the documentation we'll be going over the creation of pages, blog posts and recipe posts. Mostly it's all regular usage, there are a few theme specific options which we will be covering.
Blog Posts
Posts can be managed in WP Admin → Posts. There is no custom functionality for blog posts in the theme, it's all regular WordPress usage. If you are new to WordPress check out the official documentation on writing posts at https://codex.wordpress.org/Writing_Posts.
Recipe Posts
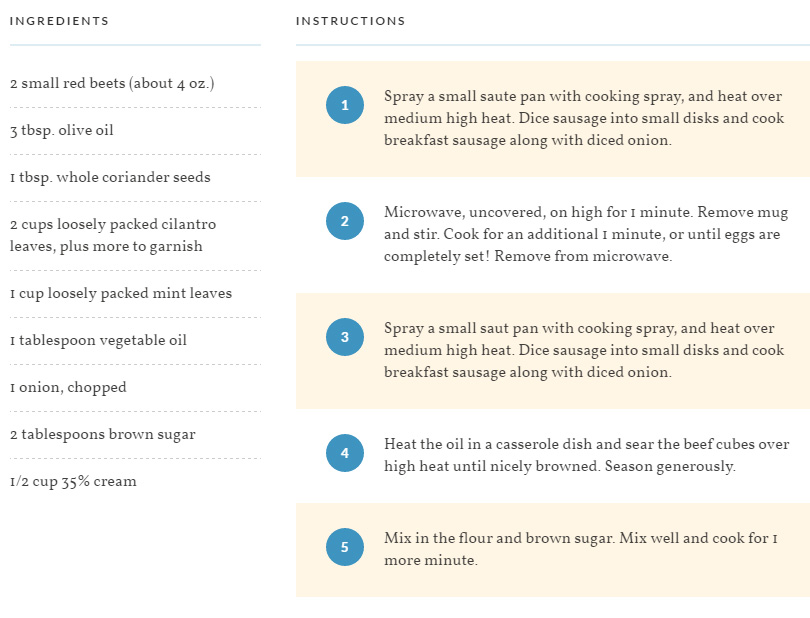
Recipes can be managed in WP Admin → Recipes. General functionality is the same as with blog posts, there are just some extra options for recipes. Those options are shown in the section called Recipe Options located just below the main content editor.
In the Recipe Options section you can set the amount of servings the recipe is for, how long is the preparation time, which ingredients are used and set the step by step instructions on preparing the recipe.

Those settings will then be shown on the website like this.
Pages
Pages can be managed in WP Admin → Pages. It's all regular pages management like with any other theme except for some custom options and a few page templates.
Custom Options
The custom options are the Featured Section and Content Sections options, they're covered in the homepage part of the documentation.
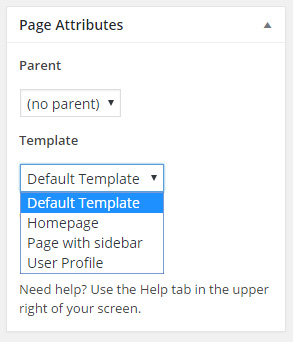
Page Templates
Page template can be changed in the Page Attributes section located in the right sidebar area when adding/editing a page ( screenshot below ).
The theme comes with 4 page templates:
- Default ( a regular page, no sidebar )
- Page With Sidebar ( a regular page, with sidebar )
- Homepage ( set it on the page that powers your homepage )
- User Profile ( a page for user profiles, more on that below )
User Profile Page
If you are going to allow visitors to register on your website as users, they will be able to rate and bookmark recipes. This page is where they can see the recipes they viewed last, recipes they bookmarked and recipes they rated.
Simply add a new page and set the User Profile page template for it. A link to that page will be then shown in the right section of the header for logged in users
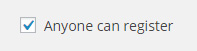
Note: By default user registration in WordPress is disabled. To enable anyone to register on your website go to WP Admin → Settings → General, check the "Anyone can register" checkbox and save changes.
Other
In this section we will cover some extra features like Meridian Styler, Meridian Popups and Meridian Promo Bar. These are all optional plugins, you don't need to use them for the theme to function.
Meridian Styler
Styler is custom functionaly we've built so you can easily change the styling of the theme to suit your needs. When you're logged in as the administrator you will see this in the top left corner ( image below ) on any page.

To activate it simply click on it and it will go into active mode ( image below ).

While Styler is in active mode, when you hover elements that can be changed you will see a border around them ( image below ).

Clicking on any of those elements will show the options available for that element in the panel ( image below ).

As you can see the options are separated into different sections:
- Typography ( font size, family, color... )
- Spacing ( margins and paddings )
- Background ( bg color )
- Border ( border radius )
- Animation ( CSS3 animations )
Clicking on any of the sections will show options for those section.

As you change options you will see the changes you make immediately.

At any time you can click on a different element to change it's styling properties.
Once done with changes simply press the Publish Changes button and that's it.
Or you can discard the changes by clicking the Discard Changes button. You will be given 2 options, to discard what you made this session or all changes you've made with it.
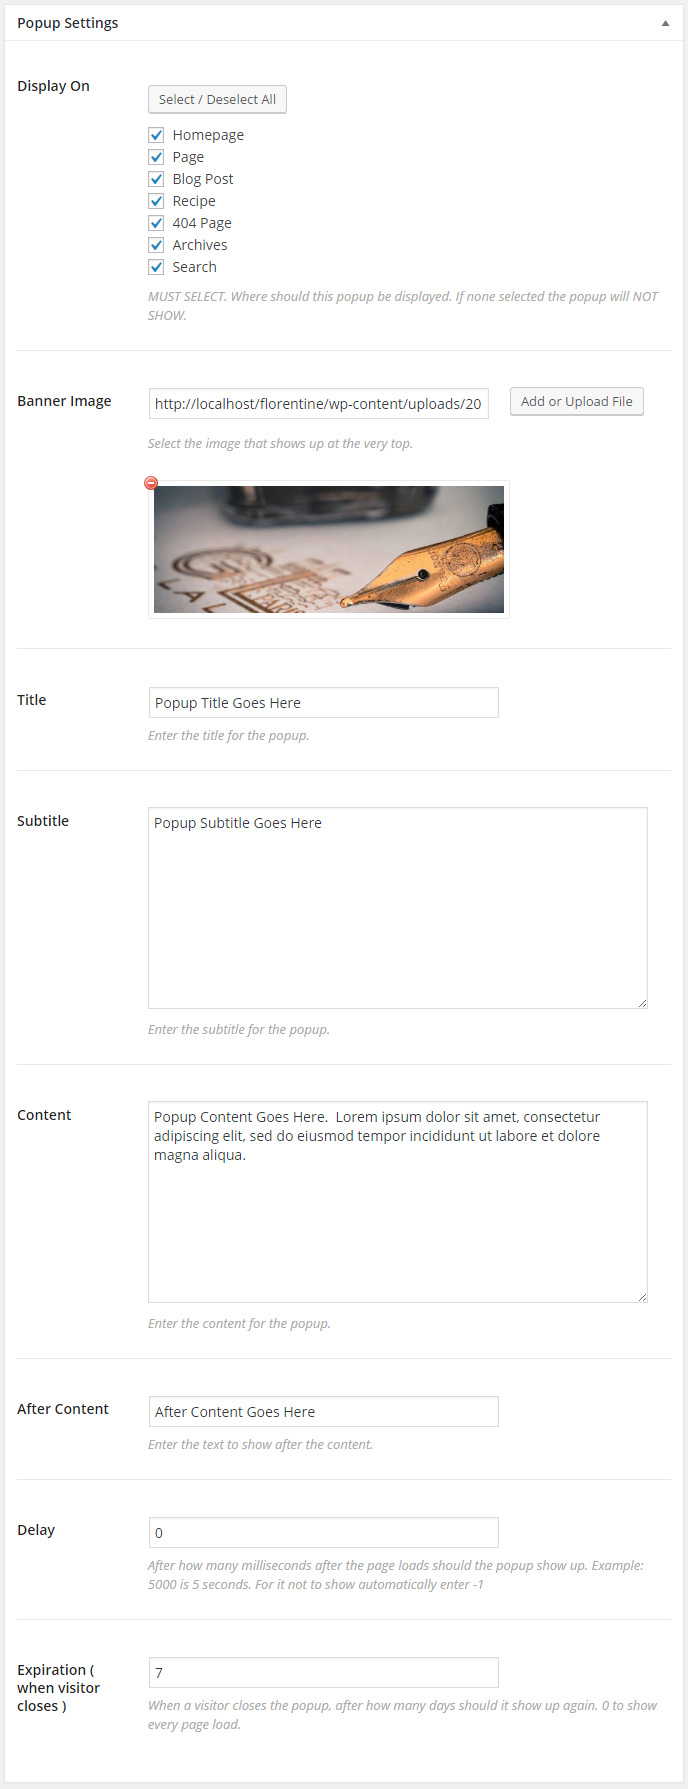
Meridian Popup
It's a typical popup like you can see on many websites these days. We tried existing plugins but some didn't look very good, some were too complex and we eventually decided to build a custom one for our themes.
If you have installed the Meridian Popup plugin, you can manage popups in WP Admin → Popups. When adding a popup you will see the options like in the screenshot below.
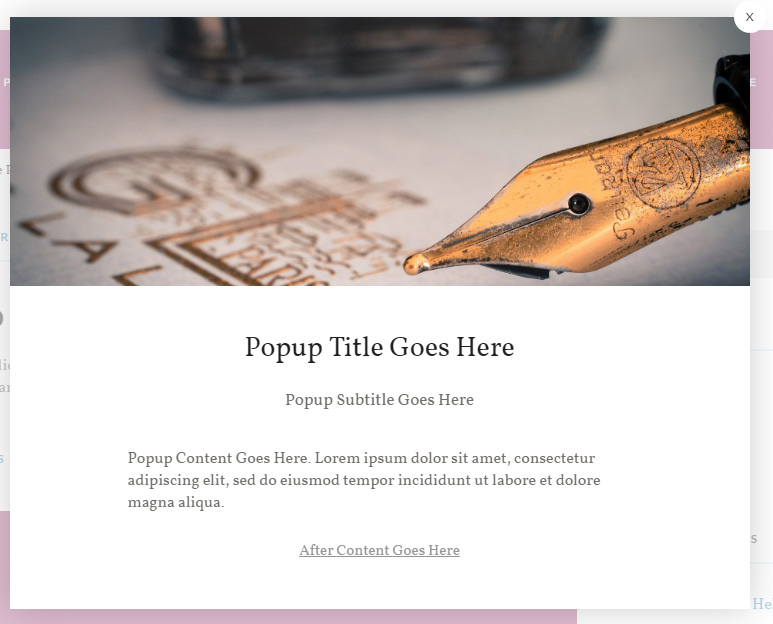
And this is how the popup looks to the visitor.
The Popup From The Demo
As you've seen on the theme demo there is a subscribe popup. We are using the OptinForms plugin for that. Simply create a form and make sure to choose design 06 and then add the shortcode [optinform] in the Content textarea of the popup.
The popup on the demo does not show immediately, it shows when the "Subscribe" button in the top bar ( promo bar ) is clicked. In order to make the popup not show automatically set the Delay option to -1.
To manually show the popup you need an anchor with the href parameter set to #meridian_popup. When the users clicks on it, the popup will show up. In the case of the demo we have set #meridian_popup as the URL of the button in the promo bar ( more on promo bar just after this section ).
Also, since it's not automatically triggered it's best to set the Expiration option to 0.
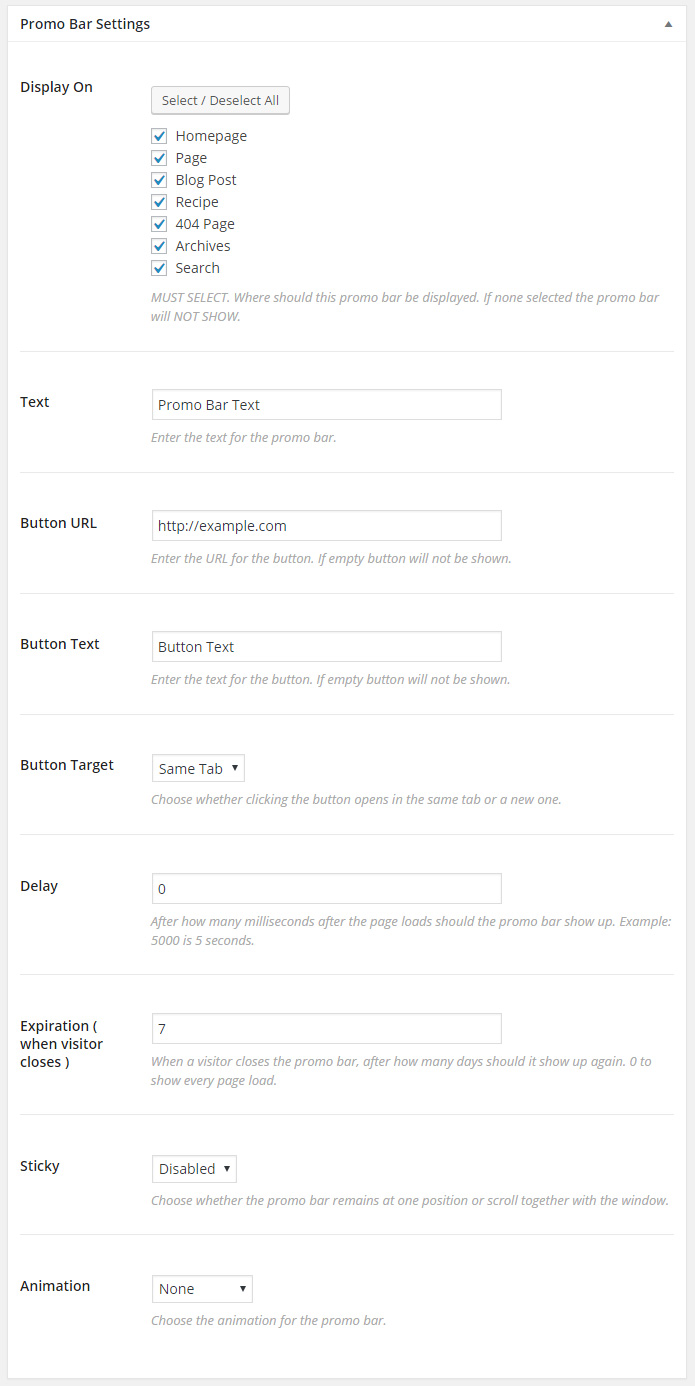
Meridian Promo Bar
A promo bar shows at the very top of the page. It's useful if you have some announcement to make or as in the theme demo to get attention of newsletter subscription.
If you have installed the Meridian Promo Bar plugin, you can manage promo bars in WP Admin → Promo Bars. When adding a promo bar you will see the options like in the screenshot below.
And this is how the promo bar looks to the visitor.
